swd-deploy 一个简单方便的前端自动部署工具,可通过使用 npm 将包安装到你的项目中。

Package: swd-deploy
Created by: zlluGitHub
Last modified: Sat, 20 Apr 2024 10:52:26 GMT
Version: 2.1.8
License: ISC
Downloads: 17
Repository: https://github.com/zlluGitHub/swd-deploy
Install
npm install swd-deploy
yarn add swd-deploy
前言
我们在常规的前端项目中,前端项目部署都需要经过本地 build 打包、压缩文件、将压缩包上传至服务器并解压文件等步骤,过程较为繁琐。所以本人编写了一个名为 swd-deploy 的 nodejs 脚本,可通过使用 npm 将包安装到你的项目中使用,用来告别手动上传的过程,配置使用简单,实现前端一键自动化部署。
::: warning 注意
前端自动化编译与部署脚本,当前只支持 window 上传至 linux 服务器以及 linux 上传至 linux 服务器。
:::
快速安装
1、局部使用
项目内使用
npm i swd-deploy --save
2、全局使用
可以用于上传指定文件或文件夹。
npm i swd-deploy -g
比如上传本地的index.js文件和dir2文件夹到远程服务器/home/dir文件夹下。
deploy --host='127.0.0.1' --port=22 --username=root --password=xxxxxx --localPath=/dir1/index.js,/dir2 --wwwPath=/home/dir
项目内使用
第一步
在你的项目 package.json 文件中的 scripts 字段中添加如下内容:
 {
  "scripts": {
    "deploy": "npx deploy",
  }
}
npm run deploy
另外,还支持通过命令参数进行自动部署,例如:
npx deploy --key=production
其中 production 为 deploy.config.js 配置文件中的 key 值。
第二步
在你项目根目录添加 deploy.config.js 文件默认内容如下(可以配置很多...):
 module.exports = Object.freeze({
  development: {//测试
    title: "开发环境", //提示标题
    // x[已废弃] sshIp: '10.0.85.100',
    host: '127.0.0.1',// 新增字段与 sshIp 一致
    port: 22,
     // x[已废弃] sshUserName: 'root',
    username: 'root',
    password: '',
    wwwPath: '',
    // x[已废弃] distFolder: 'src', // 打包后的文件夹 默认 /dist
    localPath: '', // 新增字段与distFolder一致 默认 /dist
    configPath: '', // deploy.config.js文件路径 默认项目根目录(./)
    ignoreFiles: '', // 忽略文件 多个文件用 , 隔开 例如 .git, .gitignore, .DS_Store
    loadingStyle: 'arrow4', // 打包后的文件夹 默认 /dist
    // x[已废弃] buildShell: '',// 'npm run build', // 自定义打包命令 若为空则会直接部署,不会打包
    build: '',// 'npm run build', // 自定义打包命令 若为空则会直接部署,不会打包
    readyTimeout: 60000 // 超时时间
  },
  production: {//正式
    title: "", //提示标题
    sshIp: 'xx.xxx.xx.xx',
    sshPort: "", // ssh端口 默认:22
    sshUserName: 'xxxxx',
    password: 'xxxxxx',
    wwwPath: '',
    loadingStyle: 'arrow4',
    buildShell: 'npm run build',
    readyTimeout: 5000
  },
  xxx: {
    ...
  }
  ...
})
其中 development,development,xxx 均为 key 变量,可自行修改。
用秘钥登录服务器(推荐)
- 把本机 公钥
.ssh目录下id_rsa.pub放服务器authorized_keys文件里, 多个电脑公钥换行分开 private本机私钥文件地址(需要在服务器用户目录 一般是~/.ssh/authorized_keys配置公钥 并该文件权限为600, (.ssh文件夹一般默认隐藏)- 一般
.ssh在用户目录下cd ~/.ssh/复制路径放下面pwd可查看当前路径 路径用/别\例如以下C:/Users/Administrator/.ssh/id_rsa
然后执行:
 npx deploy
# 或者
npm run deploy
就可以部署了!
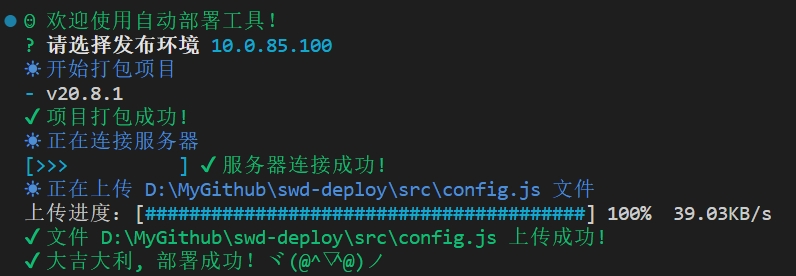
示例